最終更新日:2016年9月20日
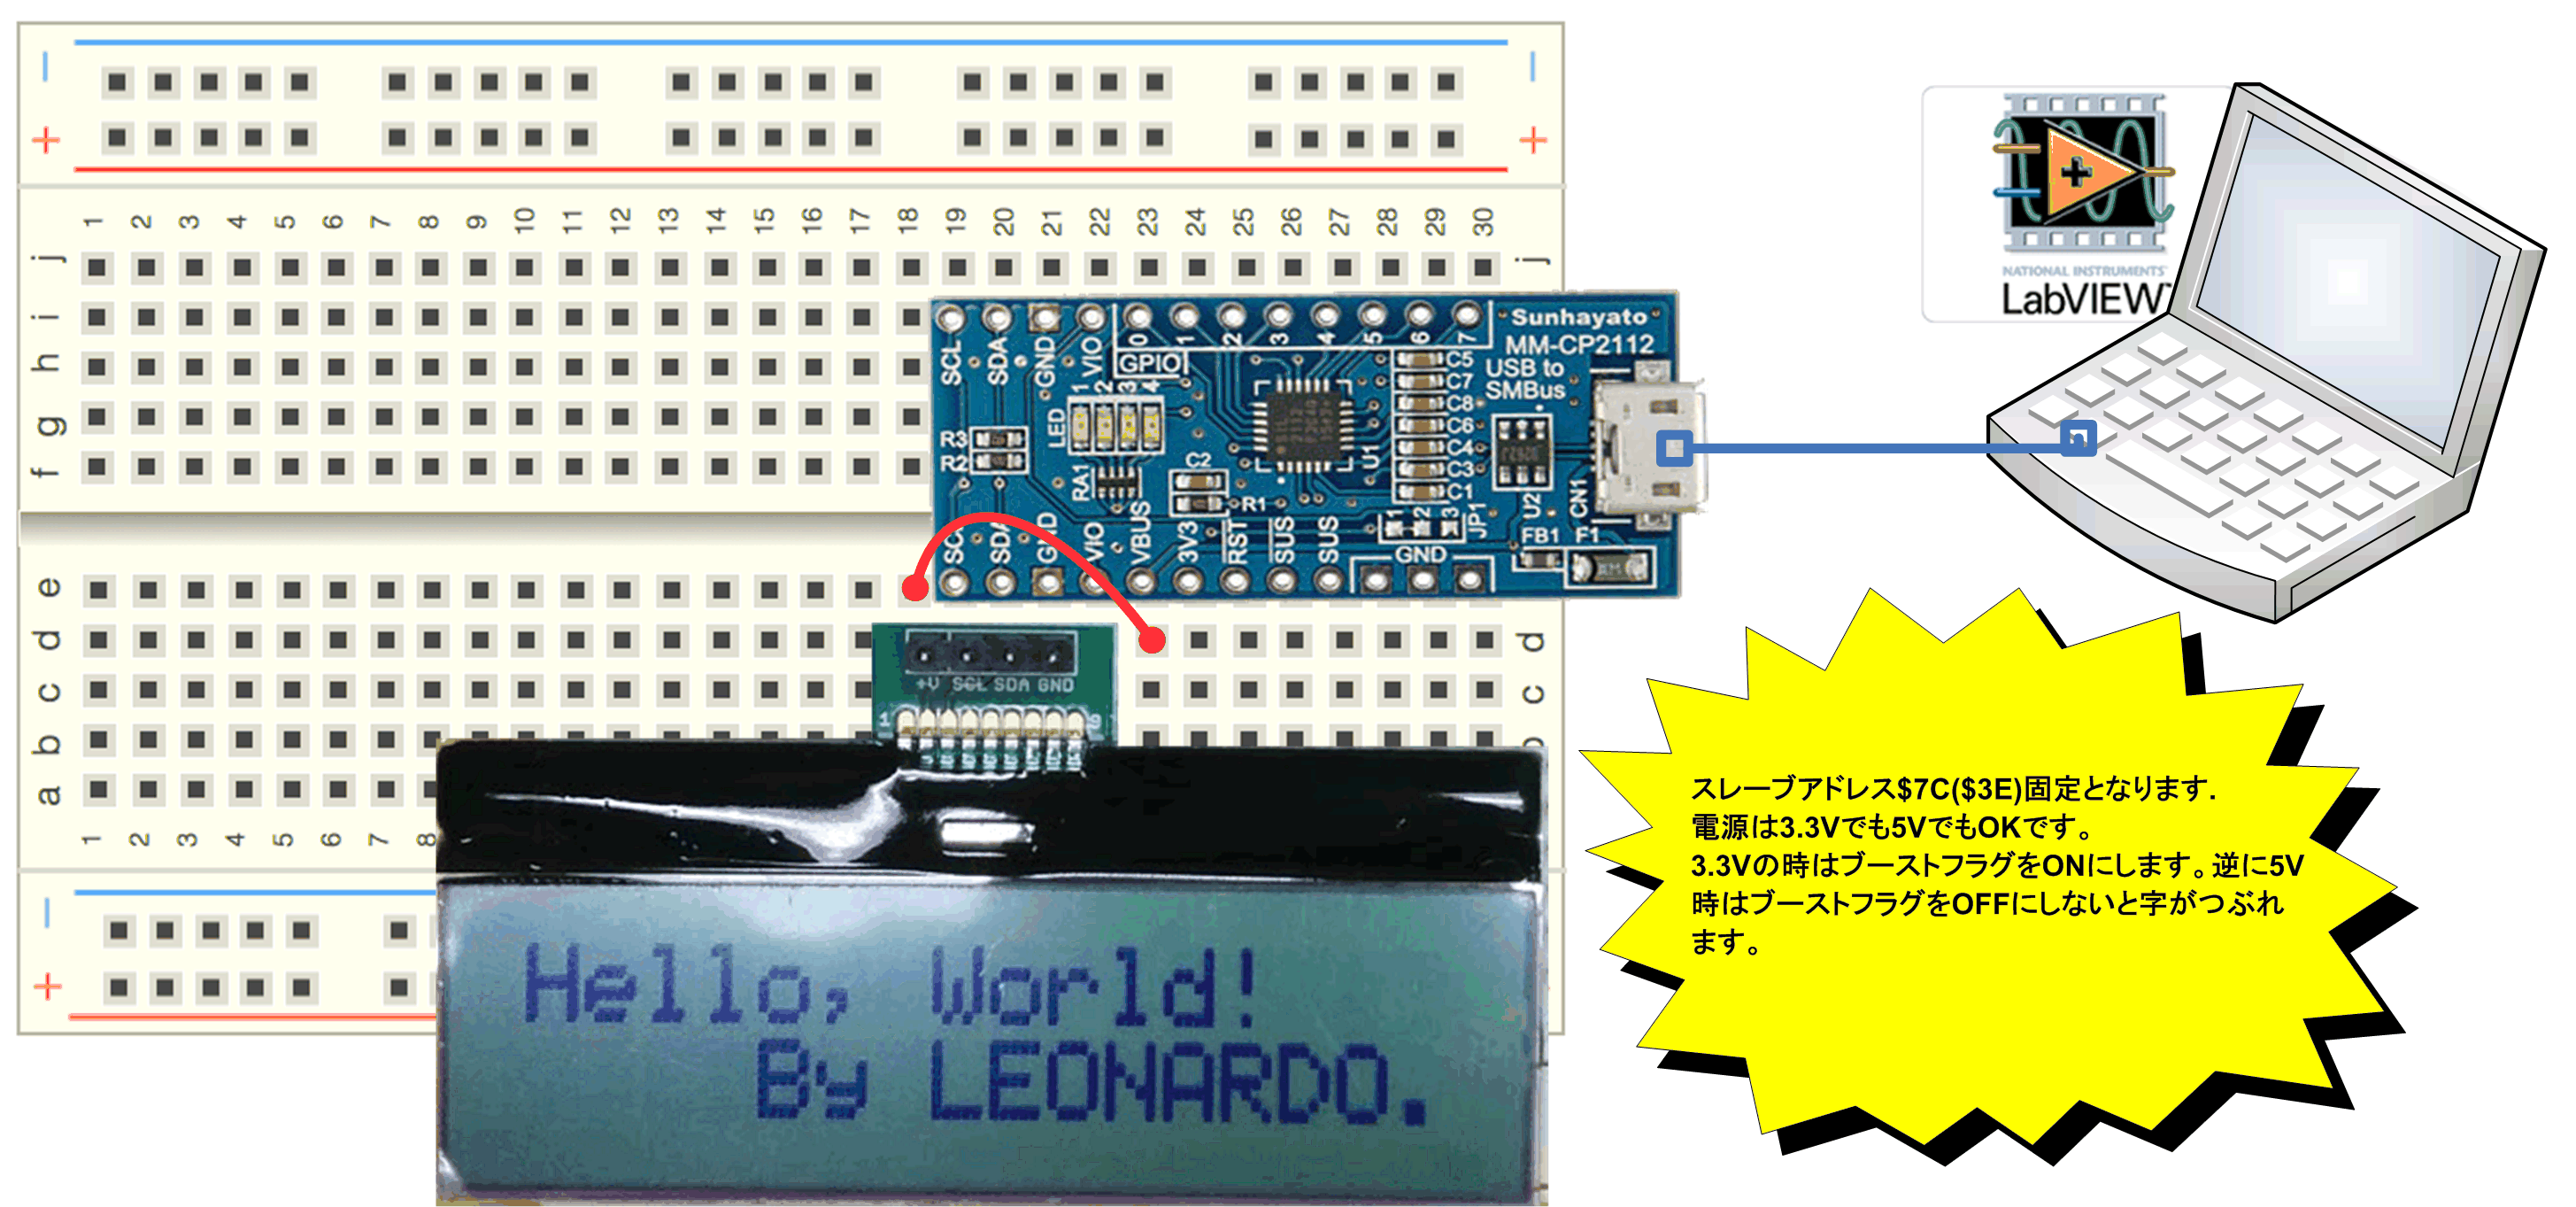
秋月電子通商が提供しているI2C接続小型キャラクタLCDモジュールAQM1602をCP2112を介してアクセスできるよう、ライブラリを作成しました。一度作っておくと、Arduino向けとかRaspberryPi向けに改造しやすくなるため意味があると思いました。実際にLINXforArduinoも作ってみましたが、2時間ぐらいで移植できると思います。
Sitronix社のST7032を2.54ピッチ変換基板を付けて販売されているもので、使い勝手としては、可成り改善された感があります。
PC側の制御はST7032の資料を参考に作成することになります
VITreeは以下のようになっています。
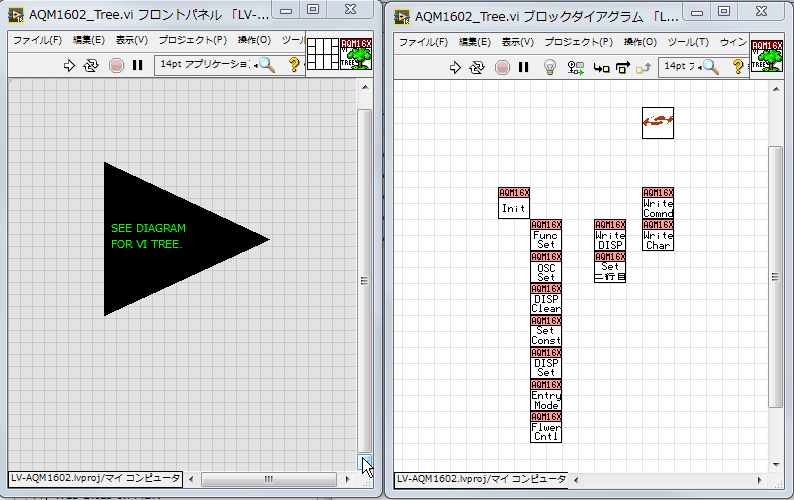
オブジェクト自体はベクター殿のストレージをお借りしています。
URL 出来る事は、
- LabVIEW2014開発環境(32bit)環境でAQM1602を利用したアプリケーション開発が出来ます。
- LabVIEW2014開発環境で作成しましたが、コンバートだけなら最新の評価版でLV8.0までプロジェクト毎ダウンコンバート出来るかと思います
- 16文字×2行のASCII文字表示が出来ます。
- コマンドマップは以下のように公開されています。
instruction table at “Normal mode”
Instruction Rs R/W DB7 DB6 DB5 DB4 DB3 DB2 DB1 DB0 Description Clear
Display0 0 0 0 0 0 0 0 0 1 Write "20H" to DDRAM. and set
DDRAM address to "00H" from ACReturn
Home0 0 0 0 0 0 0 0 1 x Set DDRAM address to "00H" from
AC and return cursor to its original
position if shifted. The contents of
DDRAM are not changed.Entry Mode
Set0 0 0 0 0 0 0 1 I/D S Sets cursor move direction and
specifies display shift. These
operations are performed during
data write and read.Display
ON/OFF0 0 0 0 0 0 1 D C B D=1:entire display on
C=1:cursor on
B=1:cursor position onCursor or
Display Shift0 0 0 0 0 1 S/C R/L x x S/C and R/L:
Set cursor moving and display shift
control bit, and the direction, without
changing DDRAM data.Function Se 0 0 0 0 1 DL N x x x DL: interface data is 8/4 bits
N: number of line is 2/1Set CGRAM 0 0 0 1 AC5 AC4 AC3 AC2 AC1 AC0 Set CGRAM address in address
counterSet DDRAM
address0 0 1 AC6 AC5 AC4 AC3 AC2 AC1 AC0 Set DDRAM address in address
counterRead Busy
flag and
address0 1 BF AC6 AC5 AC4 AC3 AC2 AC1 AC0 Whether during internal operation or
not can be known by reading BF.
The contents of address counter
can also be read.Write data
to RAM1 0 D7 D6 D5 D4 D3 D2 D1 D0 Write data into internal RAM
(DDRAM/CGRAM)Read data
from RAM1 1 D7 D6 D5 D4 D3 D2 D1 D0 Read data from internal RAM
(DDRAM/CGRAM)
instruction table at “Extension mode”
Instruction Rs R/W DB7 DB6 DB5 DB4 DB3 DB2 DB1 DB0 Description Clear
Display0 0 0 0 0 0 0 0 0 1 Write "20H" to DDRAM. and set
DDRAM address to "00H" from ACReturn
Home0 0 0 0 0 0 0 0 1 x Set DDRAM address to "00H" from
AC and return cursor to its original
position if shifted. The contents of
DDRAM are not changed.Entry Mode
Set0 0 0 0 0 0 0 1 I/D S Sets cursor move direction and
specifies display shift. These
operations are performed during
data write and read.Display
ON/OFF0 0 0 0 0 0 1 D C B D=1:entire display on
C=1:cursor on
B=1:cursor position onFunction Se 0 0 0 0 1 DL N DH 0 IS DL: interface data is 8/4 bits
N: number of line is 2/1
DH: double height font
IS: instruction table selectSet DDRAM
address0 0 1 AC6 AC5 AC4 AC3 AC2 AC1 AC0 Set DDRAM address in address
counterRead Busy
flag and
address0 1 BF AC6 AC5 AC4 AC3 AC2 AC1 AC0 Whether during internal operation or
not can be known by reading BF.
The contents of address counter
can also be read.Write data
to RAM1 0 D7 D6 D5 D4 D3 D2 D1 D0 Write data into internal RAM
(DDRAM/CGRAM/ICONRAM)Read data
from RAM1 1 D7 D6 D5 D4 D3 D2 D1 D0 Read data from internal RAM
(DDRAM/CGRAM/ICONRAM)
Instruction table 0(IS=0)
Instruction Rs R/W DB7 DB6 DB5 DB4 DB3 DB2 DB1 DB0 Description Cursor or
Display Shift0 0 0 0 0 1 S/C R/L x x S/C and R/L:
Set cursor moving and display shift
control bit, and the direction, without
changing DDRAM data.Set CGRAM 0 0 0 1 AC5 AC4 AC3 AC2 AC1 AC0 Set CGRAM address in address
counter
Instruction table 0(IS=1)
Instruction Rs R/W DB7 DB6 DB5 DB4 DB3 DB2 DB1 DB0 Description Internal OSC
frequency0 0 0 0 0 1 BS F2 F1 F0 BS=1:1/4 bias
BS=0:1/5 bias
F2~0: adjust internal OSC
frequency for FR frequency.Set ICON
address0 0 0 1 0 0 AC3 AC2 AC1 AC0 Set ICON address in address
counter.Power/ICON
control/Contr
ast set0 0 0 1 0 1 Ion Bon C5 C4 Ion: ICON display on/off
Bon: set booster circuit on/off
C5,C4: Contrast set for internal
follower mode.Follower
control0 0 0 1 1 0 Fon Rab2 Rab1 Rab0 Fon: set follower circuit on/off
Rab2~0:
select follower amplified ratio.Contrast set 0 0 0 1 1 1 C3 C2 C1 C0 Contrast set for internal follower
mode.
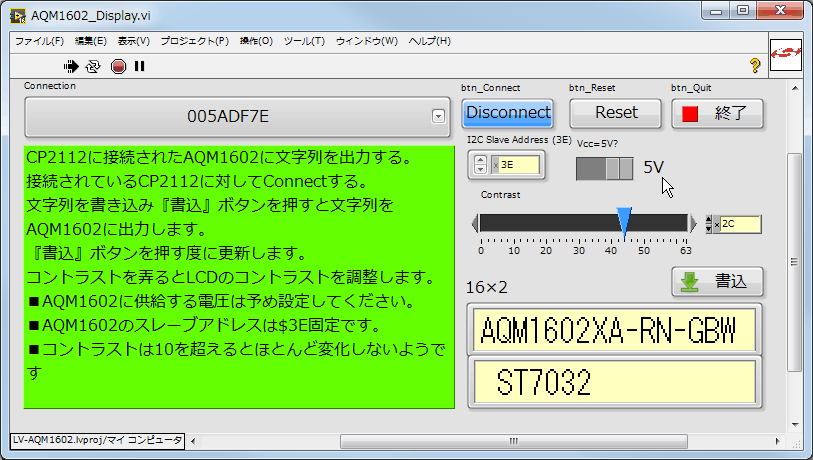
実際にExampleを実行した例を挙げておきます。
|
|
文字列を一気に書き込むExampleを用意しています。 輝度調整は初期化時の設定以外にも、随時変更できるようにしています。※ただ、0-10ぐらいまでで、それ以上は飽和です。 |
免責事項
本ソフトウエアは、あなたに対して何も保証しません。本ソフトウエアの関係者(他の利用者も含む)は、あなたに対して一切責任を負いません。
あなたが、本ソフトウエアを利用(コンパイル後の再利用など全てを含む)する場合は、自己責任で行う必要があります。本ソフトウエアの著作権はToolsBoxに帰属します。
本ソフトウエアをご利用の結果生じた損害について、ToolsBoxは一切責任を負いません。
ToolsBoxはコンテンツとして提供する全ての文章、画像等について、内容の合法性・正確性・安全性等、において最善の注意をし、作成していますが、保証するものではありません。
ToolsBoxはリンクをしている外部サイトについては、何ら保証しません。
ToolsBoxは事前の予告無く、本ソフトウエアの開発・提供を中止する可能性があります。
商標・登録商標
Microsoft、Windows、WindowsNTは米国Microsoft Corporationの米国およびその他の国における登録商標です。
Windows Vista、Windows XPは、米国Microsoft Corporation.の商品名称です。
LabVIEW、National Instruments、NI、ni.comはNational Instrumentsの登録商標です。
I2Cは、NXP Semiconductors社の登録商標です。
その他の企業名ならびに製品名は、それぞれの会社の商標もしくは登録商標です。
すべての商標および登録商標は、それぞれの所有者に帰属します。