Ethernet3_UDPSendReceiveString

最終更新日:2023/3/13

インクルードするライブラリですが、Ethernet3を使用します。このライブラリは安定していると思います。
TM1637用のポートは確保します。

オリジナルコード

/*
  UDPSendReceive.pde:
 This sketch receives UDP message strings, prints them to the serial port
 and sends an "acknowledge" string back to the sender
 A Processing sketch is included at the end of file that can be used to send
 and received messages for testing with a computer.
 created 21 Aug 2010
 by Michael Margolis
 This code is in the public domain.
 */

#include <SPI.h>         // needed for Arduino versions later than 0018
#include <Ethernet3.h>
#include <EthernetUdp3.h>         // UDP library from: bjoern@cs.stanford.edu 12/30/2008

// Enter a MAC address and IP address for your controller below.
// The IP address will be dependent on your local network:
byte mac[] = {
  0xDE, 0xAD, 0xBE, 0xEF, 0xFE, 0xED
};
IPAddress ip(192, 168, 1, 177);
unsigned int localPort = 8888;      // local port to listen on
// buffers for receiving and sending data
char packetBuffer[UDP_TX_PACKET_MAX_SIZE]; //buffer to hold incoming packet,
char  ReplyBuffer[] = "acknowledged";       // a string to send back
// An EthernetUDP instance to let us send and receive packets over UDP
EthernetUDP Udp;
void setup() {
  // start the Ethernet and UDP:
  Ethernet.begin(mac, ip);
  Udp.begin(localPort);
  Serial.begin(9600);
}
void loop() {
  // if there's data available, read a packet
  int packetSize = Udp.parsePacket();
  if (packetSize)
  {
    Serial.print("Received packet of size ");
    Serial.println(packetSize);
    Serial.print("From ");
    IPAddress remote = Udp.remoteIP();
    for (int i = 0; i < 4; i++)
    {
      Serial.print(remote[i], DEC);
      if (i < 3)
      {
        Serial.print(".");
      }
    }
    Serial.print(", port ");
    Serial.println(Udp.remotePort());
    // read the packet into packetBufffer
    Udp.read(packetBuffer, UDP_TX_PACKET_MAX_SIZE);
    Serial.println("Contents:");
    Serial.println(packetBuffer);
    // send a reply, to the IP address and port that sent us the packet we received
    Udp.beginPacket(Udp.remoteIP(), Udp.remotePort());
    Udp.write(ReplyBuffer);
    Udp.endPacket();
  }
  delay(10);
}

/*
  Processing sketch to run with this example
 =====================================================
 // Processing UDP example to send and receive string data from Arduino
 // press any key to send the "Hello Arduino" message

 import hypermedia.net.*;
 UDP udp;  // define the UDP object

 void setup() {
 udp = new UDP( this, 6000 );  // create a new datagram connection on port 6000
 //udp.log( true ); 		// <-- printout the connection activity
 udp.listen( true );           // and wait for incoming message
 }
 void draw()
 {
 }
 void keyPressed() {
 String ip       = "192.168.1.177";	// the remote IP address
 int port        = 8888;		// the destination port
 udp.send("Hello World", ip, port );   // the message to send
 }
 void receive( byte[] data ) { 			// <-- default handler
 //void receive( byte[] data, String ip, int port ) {	// <-- extended handler
 for(int i=0; i < data.length; i++)
 print(char(data[i]));
 println();
 }
 */

説明

W5500-EVB-PICO単体で使用するEthernetスケッチです。今回はAdvancedChatServerです。
W5500-EVB-PICOはW5500とRP2040をSPI接続しています。GP16..21が占有されます。
汎用ライブラリの場合、自分でちゃんとPIN指定した方がいいです。
また、W5500のRESETピンがPULL_UPされていないようなので、自分でHIGHに固定する必要がありそうです。

MACアドレスはWIZNET系にしておきます。
IPは192.168.0.210にしておきます。UDPポートは8888にします。
別途UDPツールが必要です。NonSoft殿のUDP/IPテストツールで検証しました。
http://www.vector.co.jp/soft/dl/winnt/net/se478370.html
ポート番号とIPアドレスを入力して接続します。
何らかの文字列を入力してSENDすることでサーバ側シリアルモニタに文字列が確認出来ます。


レタッチコード

/*
 * 2023/03/13 T.Wanibe
 * UDPSendReceive.pde:
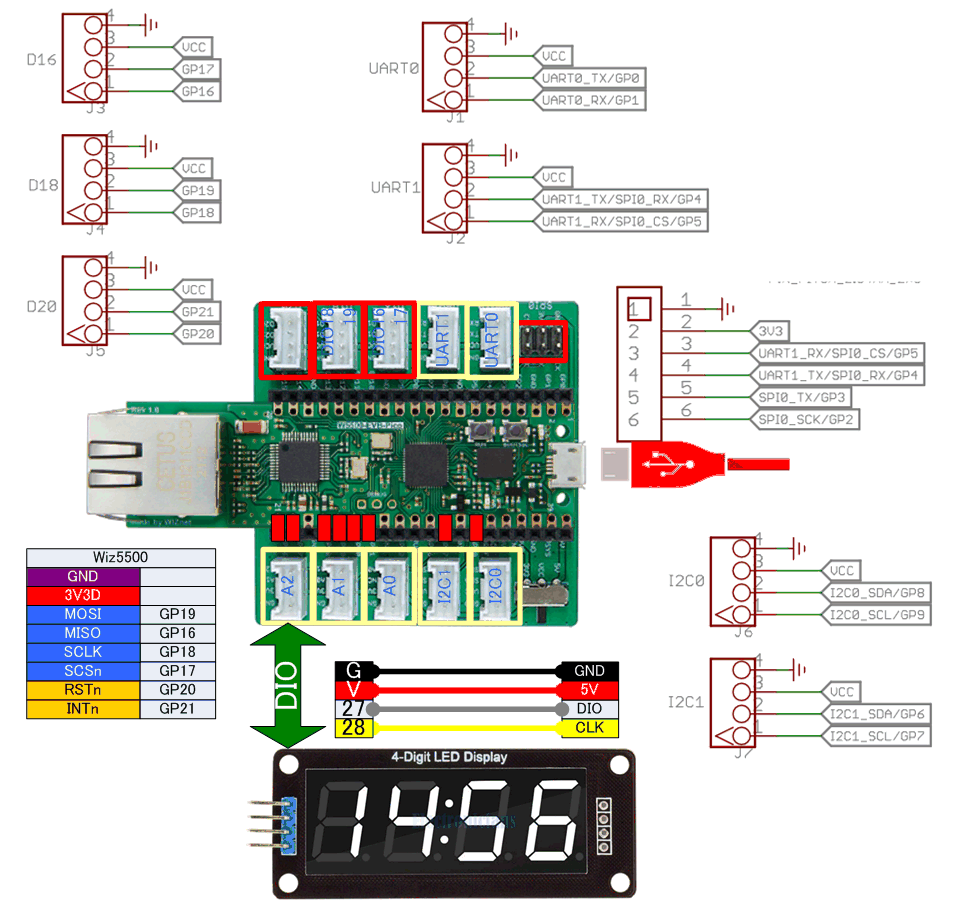
  * W5500-EVB-PICOをターゲットとしています
 * 回路:
 * ピン 16..21に接続されたイーサネットchip
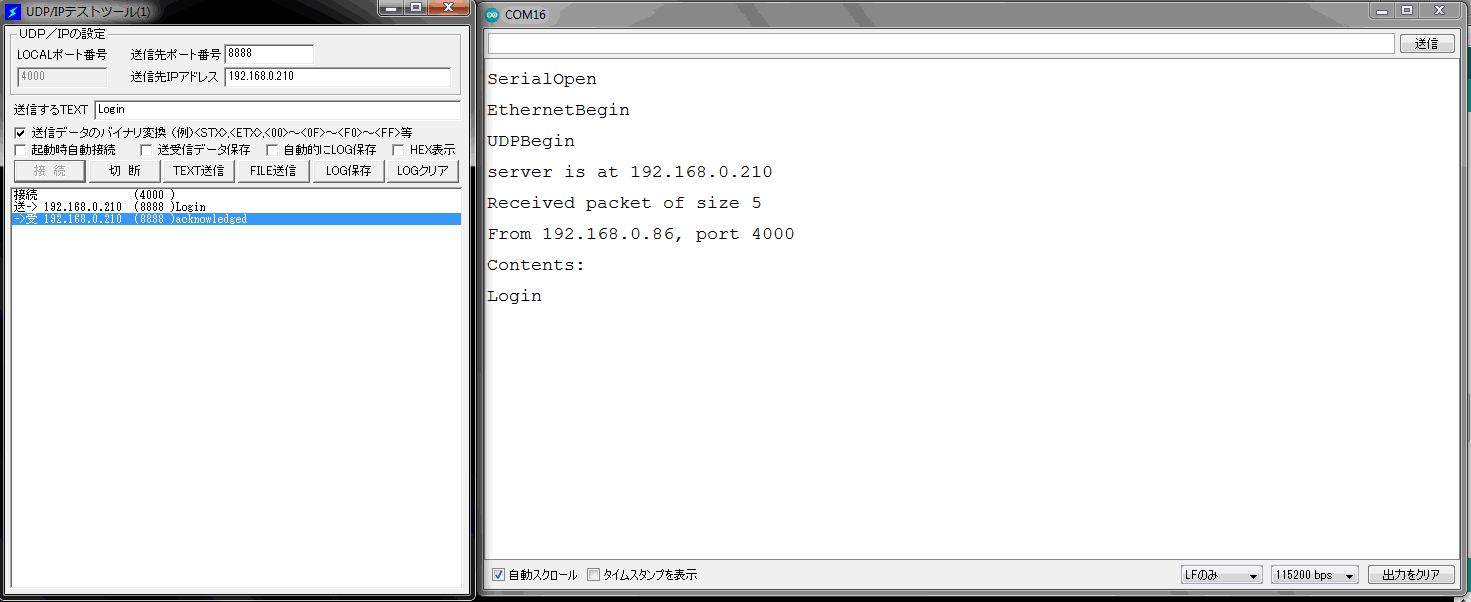
 * このスケッチは UDP メッセージ文字列を受信し、それらをシリアル ポートに出力します。
 * 「確認」文字列を送信者に送り返します
 * 最大1044480バイトのフラッシュメモリのうち、スケッチが60132バイト(5%)を使っています。
 * 最大262144バイトのRAMのうち、グローバル変数が8004バイト(3%)を使っていて、ローカル変数で254140バイト使うことができます。
 */

#include <SPI.h>         // needed for Arduino versions later than 0018
#include <Ethernet3.h>
#include <EthernetUdp3.h>         // UDP library from: bjoern@cs.stanford.edu 12/30/2008
#define         SPI_SCK         18
#define         SPI_RX          16
#define         SPI_TX          19
#define         SPI_CS          17
#define         NICReset        20
#define         HTTPport        80
#define         TELNETport      23
#define         SerialRate      115200
// コントローラの MAC アドレスと IP アドレスを以下に入力します。
// IP アドレスは、ローカル ネットワークによって異なります。
// ゲートウェイとサブネットはオプションです。
byte            mac[]           = {0x00,0x08,0xDC,0x54,0x4D,0xE0};              //WIZNET
byte            ip[]            = {192, 168, 0, 210};
byte            dns_server[]    = {192, 168, 0, 1};
byte            gateway[]       = {0, 0, 0, 0};
byte            subnet[]        = {255, 255, 255, 0};
unsigned int    localPort       = 8888;                                         // local port to listen on
byte            flag            = 1;
// データを送受信するためのバッファ
char            packetBuffer[UDP_TX_PACKET_MAX_SIZE];                           //buffer to hold incoming packet,
char            ReplyBuffer[]   = "acknowledged";                               // a string to send back
// UDP 経由でパケットを送受信できるようにする EthernetUDP インスタンス
EthernetUDP Udp;
//----------------
void setup() {
        Serial.begin(SerialRate);
        while (!Serial) {
                ; // シリアルポートが接続されるのを待ちます。
        }
        Serial.println("SerialOpen");
        pinMode(LED_BUILTIN, OUTPUT);
        digitalWrite(LED_BUILTIN, flag);
        pinMode(SPI_CS,OUTPUT);
        pinMode(NICReset,OUTPUT);
        // イーサネット接続とサーバーを開始します。
        SPI.setSCK(SPI_SCK);
        SPI.setRX(SPI_RX);
        SPI.setTX(SPI_TX);
        SPI.setCS(SPI_CS);
        SPI.begin();
        // Ethernet.init(pin)を使用してCSピンを設定できます
        Ethernet.setCsPin(SPI_CS);
        Ethernet.setRstPin(NICReset);
        digitalWrite(NICReset,LOW);
        delay(10);
        digitalWrite(NICReset,HIGH);
        Ethernet.init(SPI_CS);
        // イーサネットと UDP を開始します。
        Ethernet.begin(mac, ip);
        Serial.println("EthernetBegin");
        Udp.begin(localPort);
        Serial.println("UDPBegin");
        Serial.print("server is at ");
        Serial.println(Ethernet.localIP());
}
//-------------
void loop() {
        flag = !flag;
        delay(100);
        digitalWrite(LED_BUILTIN, flag);
        // if there's data available, read a packet
        int packetSize = Udp.parsePacket();
        if (packetSize){
                Serial.print("Received packet of size ");
                Serial.println(packetSize);
                Serial.print("From ");
                IPAddress remote = Udp.remoteIP();
                for (int i = 0; i < 4; i++){
                        Serial.print(remote[i], DEC);
                        if (i < 3){
                                Serial.print(".");
                        }
                }
                Serial.print(", port ");
                Serial.println(Udp.remotePort());
                // パケットを packetBuffer に読み込む
                Udp.read(packetBuffer, UDP_TX_PACKET_MAX_SIZE);
                Serial.println("Contents:");
                Serial.println(packetBuffer);
                // 受信したパケットを送信した IP アドレスとポートに応答を送信します
                Udp.beginPacket(Udp.remoteIP(), Udp.remotePort());
                Udp.write(ReplyBuffer);
                Udp.endPacket();
        }
        delay(10);
}


戯言(nonsense)に戻る


問い合わせ頁の表示


免責事項

本ソフトウエアは、あなたに対して何も保証しません。本ソフトウエアの関係者(他の利用者も含む)は、あなたに対して一切責任を負いません。
あなたが、本ソフトウエアを利用(コンパイル後の再利用など全てを含む)する場合は、自己責任で行う必要があります。

本ソフトウエアの著作権はToolsBoxに帰属します。
本ソフトウエアをご利用の結果生じた損害について、ToolsBoxは一切責任を負いません。
ToolsBoxはコンテンツとして提供する全ての文章、画像等について、内容の合法性・正確性・安全性等、において最善の注意をし、作成していますが、保証するものではありません。
ToolsBoxはリンクをしている外部サイトについては、何ら保証しません。
ToolsBoxは事前の予告無く、本ソフトウエアの開発・提供を中止する可能性があります。

商標・登録商標

Microsoft、Windows、WindowsNTは米国Microsoft Corporationの米国およびその他の国における登録商標です。
Windows Vista、Windows XPは、米国Microsoft Corporation.の商品名称です。
LabVIEW、National Instruments、NI、ni.comはNational Instrumentsの登録商標です。
I2Cは、NXP Semiconductors社の登録商標です。
その他の企業名ならびに製品名は、それぞれの会社の商標もしくは登録商標です。
すべての商標および登録商標は、それぞれの所有者に帰属します。